 WEWE Kitchen Faucets
How Do You Install a Shower Faucet Trim Kit Yourself, Step by Step?
Views:133 classificationInstall
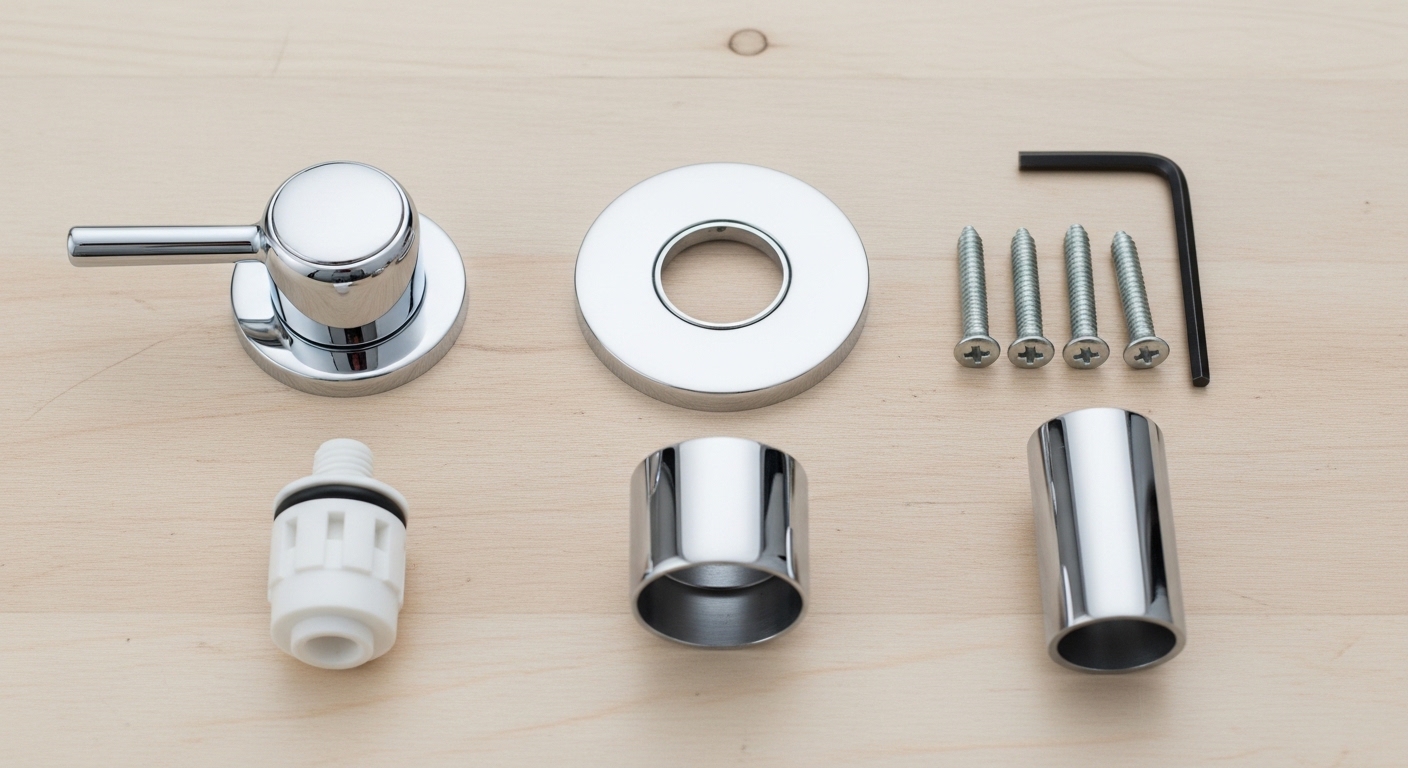
Learning how to install a shower faucet trim kit is one of the easiest plumbing upgrades a homeowner can do, because the hard part — the valve buried in the wall — is already done. A trim kit is the visible finish work: the handle, the escutcheon (that round or square plate against the tile), the trim sleeve, and often the cartridge and a diverter or shower arm. You are basically dressing up hardware that’s already plumbed in. If you can use a screwdriver and an Allen wrench, you can do this, and you’ll save the $150–$300 a plumber typically charges for what is often 40 minutes of work.
Below I’ll walk through exactly what a trim kit is, the tools you need, a full step-by-step, the mistakes that trip people up, and how to tell whether your new trim will even fit your existing valve — which is the single most important question to answer before you buy anything.
What exactly is a shower faucet trim kit, and how is it different from the valve?
A trim kit is the decorative, hands-on hardware you see and touch; the valve is the working guts hidden inside the wall. This distinction matters because you buy them separately and they are not interchangeable across brands.
The rough-in valve (also called the mixing valve) is the brass or bronze body soldered or press-fit to your hot and cold supply lines. It controls water temperature and flow, and once it’s set in the wall behind tile, you don’t touch it during a trim swap. If you’re building new or the valve itself is bad, that’s a different job — see our guide on how to install a shower valve rough-in the right way the first time, because trim work assumes that valve is already correctly set at the proper depth.
The trim kit typically includes:
- The handle (lever, cross, or knob style)
- The escutcheon plate and a foam or rubber gasket that seals it to the wall
- A trim sleeve or cover tube that hides the valve body
- The set screw and, usually, an Allen (hex) wrench
- Often a fresh cartridge, and sometimes a shower arm, flange, or diverter spout
Because the trim mounts directly onto the specific valve body, a Moen trim generally only fits a Moen valve, a Delta trim fits a Delta valve, and so on. Some brands even split their own lines — Delta’s Monitor 13 and 17 series, for example, use different trim. Confirm the valve brand and series before ordering.
Which tools and supplies do I actually need to install a shower trim kit?
You need very little: a Phillips and flathead screwdriver, an Allen/hex wrench set, plumber’s tape, and a towel. That’s genuinely most jobs. Because the plumbing connections are already made, you’re mostly threading screws and seating parts by hand.
Here’s the realistic list:
- Phillips and flathead screwdrivers — for the retaining clip and mounting screws
- Allen/hex wrench set — most handle set screws are 1/8″ or 3/32″; your kit may include the right one
- Plumber’s tape (PTFE/Teflon) — for any threaded connections like the shower arm
- Needle-nose pliers — to pull the cartridge retaining clip if it’s stubborn
- A cartridge puller — only if you’re replacing an old, stuck cartridge
- Silicone caulk — to seal the top edge of the escutcheon against water intrusion
- A towel or bucket — to catch the small amount of water left in the lines
Do not use pipe dope or excessive Teflon on cartridge O-rings — those seal by compression, not thread sealant, and grease meant for faucets (a silicone-based plumber’s grease) is the correct lubricant there.
How do you install a shower faucet trim kit step by step?
Install a shower faucet trim kit in seven steps: shut off water, remove the old trim or plaster guard, replace or seat the cartridge, mount the escutcheon and gasket, attach the sleeve and handle, restore water, and test. Here’s the full sequence.
Step 1 — Shut off the water and open the valve to drain it
Turn off the water. If your shower valve has integral stops (small screwdriver slots on the valve body), close those; otherwise shut off the main supply to the house. Then open the shower handle briefly to release pressure and let residual water drain into a towel. Skipping this step is how people get a face full of water — respect it.
Step 2 — Remove the plaster guard or the old trim
New construction: unscrew and pull off the plastic plaster guard protecting the valve. Retrofit: remove the old handle set screw, pull the handle, unthread the old escutcheon, and take out the trim sleeve. Set screws are often hidden under a decorative cap or on the underside of the handle — look before you force anything.
Step 3 — Replace or seat the cartridge (if your kit includes one)
If your trim kit comes with a new cartridge or you’re refreshing an old one, pull the retaining clip with needle-nose pliers, remove the old cartridge straight out (a cartridge puller helps if it’s stuck from mineral buildup), lightly grease the new cartridge’s O-rings with plumber’s grease, and push it in fully. Reinsert the retaining clip completely — a half-seated clip is the number one cause of a cartridge blowing out under pressure.
Step 4 — Mount the escutcheon and gasket
Slide the foam or rubber gasket onto the back of the escutcheon plate, then position the plate flat against the wall over the valve. Thread the mounting screws into the valve body’s tabs and snug them down evenly — firm, not gorilla-tight, because you can crack the plate. The gasket should compress lightly against the tile.
Step 5 — Install the trim sleeve and handle
Slide the trim sleeve over the cartridge stem, then place the handle onto the stem or adapter. Line up the set screw with the flat on the stem and tighten it with the Allen wrench until snug. Wiggle-test the handle — it should feel solid, not loose or wobbly.
Step 6 — Turn the water back on and check flow
Open the integral stops or the main slowly. Run the shower and cycle the handle from full cold to full hot. Confirm you get the full temperature range and that the diverter (if you have one) sends water between tub spout and shower head cleanly.
Step 7 — Test for leaks, then seal
Watch the escutcheon edge and behind the handle for drips for a few minutes. Once you’re confident it’s dry, run a thin bead of silicone caulk along the top and sides of the escutcheon — but leave the bottom edge unsealed, so any water that ever gets behind it has a path to escape rather than rotting your wall.
Will any trim kit fit my existing shower valve?
No — and this is the mistake that sends people back to the store. A trim kit must match the brand and series of the valve already in your wall, because each manufacturer designs its trim to mate with its own valve body and cartridge stem.
Before buying, identify your valve. Look for a logo stamped on the valve body or cartridge, check the original paperwork, or pull the old handle and photograph the cartridge and clip. Here’s how the major systems compare:
| Brand / Series | Common Valve | Trim Interchangeable? | What to Match |
|---|---|---|---|
| Moen Posi-Temp | Single-handle pressure-balance | Only within Posi-Temp | 1222 cartridge stem |
| Moen Moentrol | Volume + temp control | Only within Moentrol | Different cartridge than Posi-Temp |
| Delta Monitor 13/14 | Pressure-balance | Within same series | RP19804 cartridge |
| Delta Monitor 17 | Dual-function (temp + volume) | Only Monitor 17 trim | Separate volume control |
| Kohler Rite-Temp | Pressure-balance | Only within Rite-Temp | Rite-Temp cartridge |
| Pfister 0X8 | Pressure-balance | Only within 0X8 series | Pfister JX cartridge |
If you can’t identify the valve at all, the safest route is to pull the handle and take the cartridge to a plumbing supply counter. Guessing by looks alone almost never works, because escutcheon shape tells you nothing about the internal stem.
How long does it take, and can a total beginner really do it?
A straightforward trim swap takes 30 to 60 minutes for a first-timer, and yes, a total beginner can absolutely do it. There’s no soldering, no cutting pipe, and no gluing — you’re mounting finished parts onto an existing valve.
The time stretches longer only in specific situations: a cartridge stuck solid from years of hard-water scale, a corroded set screw that needs penetrating oil, or a valve set too deep in the wall so the trim sleeve won’t reach. That last one is a rough-in depth problem, not a trim problem, and it means the valve was installed at the wrong depth to begin with. If your handle sits too far off the wall or the escutcheon won’t sit flush, you may need an extension kit from the valve manufacturer rather than a different trim.
While you have things apart, it’s worth thinking about the whole shower experience. If you’re upgrading trim because you’re refreshing the bathroom, this is the perfect moment to also swap the shower head — our guide to rainfall shower head taps and picking the right one for low water pressure pairs naturally with a trim update, and a shower head slide bar you can install yourself without a plumber is another easy same-day add-on.
Why is my new trim leaking or the handle loose after install?
A leak or loose handle after a trim install almost always comes down to three things: an incompletely seated cartridge clip, a set screw that isn’t tightened onto the stem flat, or debris caught in the cartridge. None of these require a plumber — you just reopen and correct.
Run through this quick diagnostic:
- Water dripping from the shower head after shutoff? The cartridge isn’t seating cleanly — often a bit of debris or a not-fully-inserted cartridge. This is the same failure behind a shower that keeps running when turned off; reseat or replace the cartridge.
- Water seeping around the escutcheon? The wall gasket isn’t compressed evenly, or you sealed the bottom edge and trapped water behind the plate. Re-snug the screws and leave the bottom open.
- Handle wobbles? The set screw missed the flat on the cartridge stem. Loosen it, reseat the handle, and retighten onto the flat.
- Diverter won’t send water up to the head? If your setup uses a separate diverter, confirm it’s the right part and fully seated — our Delta diverter valve installation instructions, step by step cover this in detail.
If you’ve reseated the cartridge and the leak persists, the cartridge itself may be worn or the wrong model — match the exact part number to your valve series before buying a replacement.
What does a shower trim kit cost, and is buying one worth it over hiring out?
A quality single-handle trim kit runs $40 to $150, and premium designer finishes reach $200–$400. Against a plumber’s $150–$300 labor charge for a swap, doing it yourself usually pays for the kit and then some on your first install.
Where you shouldn’t cut corners is finish quality and cartridge material. Look for solid brass valve-facing components and a physical-vapor-deposition (PVD) finish on the visible trim, which resists scratching and tarnish far better than cheap electroplating. A $45 kit that pits in two years is more expensive than a $110 kit that outlasts your remodel.
FAQ
Can I install a shower faucet trim kit without turning off the main water?
Only if your valve has integral stops — small built-in shutoffs on the valve body you can close with a screwdriver. If it doesn’t, you must shut off the house main. Never pull a cartridge under live pressure; it can eject forcefully.
Do I have to replace the cartridge when I install new trim?
Not always. If your existing cartridge works fine and isn’t leaking, you can reuse it and just install the visible trim. But if the shower drips, cycles temperature poorly, or the cartridge is more than 7–10 years old, replace it while everything’s apart — it’s the cheapest insurance you’ll ever buy.
My escutcheon won’t sit flush against the tile — what’s wrong?
Usually the valve was roughed in too deep, so the trim sleeve bottoms out before the plate reaches the wall. Most manufacturers sell an extension kit for exactly this. Don’t force the plate or over-tighten — you’ll crack it without solving the depth issue.
Can I put a different brand’s trim kit on my existing valve?
No. Trim kits are engineered to mate with the same brand’s valve body and cartridge stem. A Delta trim won’t fit a Moen Posi-Temp valve. Identify your valve brand and series first, then buy matching trim — this is the single most common return at the plumbing counter.
How do I know if my valve is pressure-balancing or thermostatic?
A single-handle valve that adjusts temperature and flow with one lever is almost always pressure-balancing. A thermostatic valve has two controls — one dedicated dial for temperature and a separate one for volume — and lets you preset an exact temperature. They use entirely different trim, so match accordingly.
Do I need to caulk around the shower handle and plate?
Yes, seal the top and sides of the escutcheon with silicone caulk to keep water out of the wall, but deliberately leave the bottom edge unsealed. That gap gives any water that ever gets behind the plate a route to drain out instead of collecting and rotting the wall.
Author note: This guide was written by the wewefaucet fixtures team, drawing on hands-on installation of pressure-balance and thermostatic shower systems across Moen, Delta, Kohler, and Pfister platforms. We’ve done these swaps in real bathrooms, not just read the spec sheets.
About wewefaucet: wewefaucet designs and tests shower and bath fixtures at www.wewefaucet.net, with cartridges and trim built to meet ASME A112.18.1/CSA B125.1 and pressure-balance safety standards (ASSE 1016) to prevent scalding. Our trim kits ship with a limited lifetime finish-and-function warranty, and every valve platform is cycle-tested well beyond typical residential use before it reaches your bathroom.
您好!please sign in