 WEWE Kitchen Faucets
How Do You Install a Shower Head Slide Bar Yourself Without Hiring a Plumber?
Views:1 classificationInstall
If you’ve been wondering exactly how to install shower head slide bar hardware without calling in a pro, here’s the reassuring truth: this is one of the most beginner-friendly bathroom upgrades you can do. You’re not cutting into walls, soldering copper, or shutting off the main. You’re attaching a vertical track to the wall and routing your handheld shower head through it. Done right, the slide bar lets everyone in the house — tall, short, seated, kids — set the spray to the perfect height in seconds.
Below I’ll walk you through the whole job the way I’d explain it to a friend standing in the bathroom with a drill in hand: what you need, where to drill, how to avoid cracking a tile, and the mistakes that cause leaks or a wobbly bar a week later.
What exactly is a shower head slide bar, and do I actually need one?
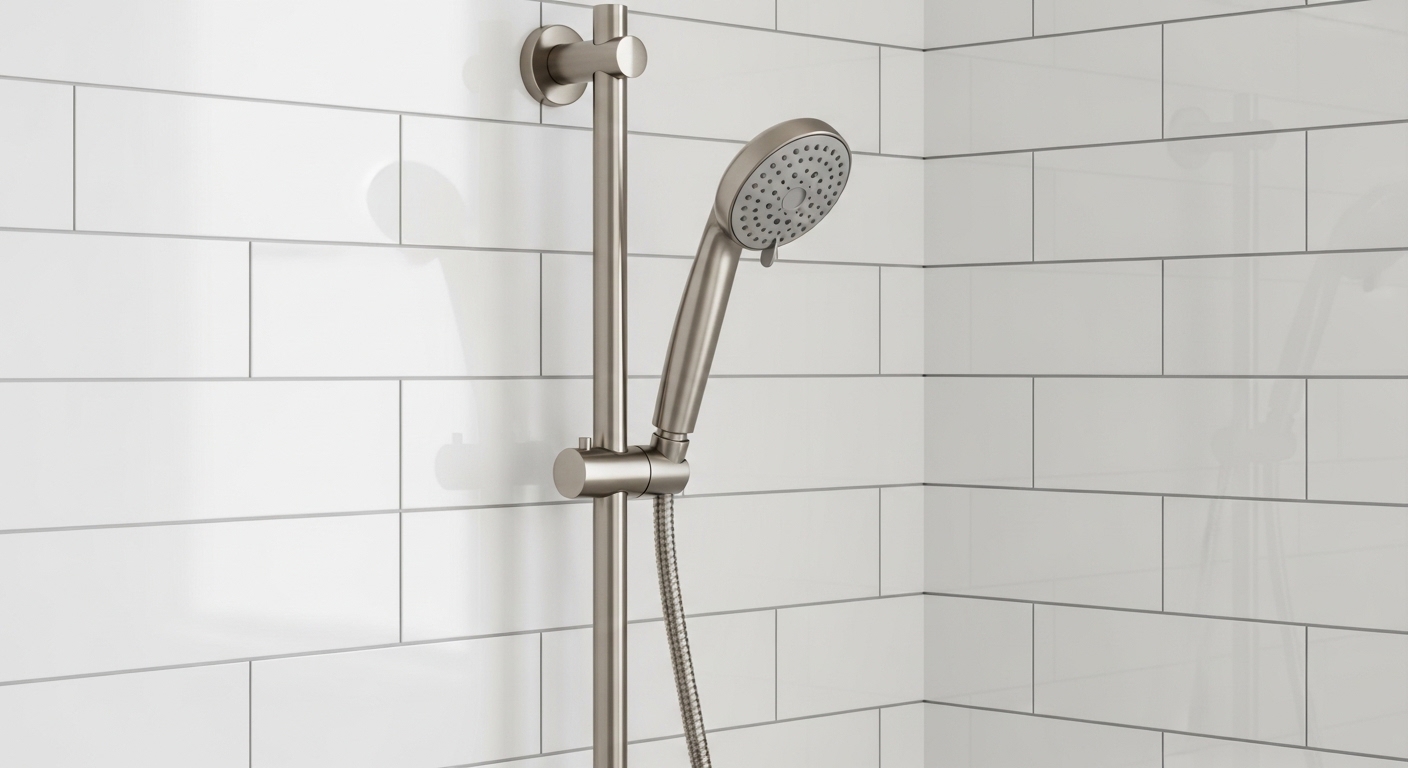
A shower head slide bar is a vertical rail mounted to your shower wall that holds a handheld shower head in an adjustable bracket, so you can slide the spray up or down to any height and lock it in place. You need one if more than one person uses the shower at different heights, if you bathe kids or pets, if someone in the home showers seated, or if you simply want a handheld you can grab for rinsing and detailing without holding it the whole time.
There are three core pieces in almost every kit: the bar (rail) with two mounting brackets, the sliding holder that travels along the bar and tilts, and the handheld shower head plus flexible hose. Most kits connect to your existing shower arm — the chrome pipe sticking out of the wall — so the water supply is already solved for you.
A few quick reasons people install one:
- Multiple heights: a 6’4″ partner and a 5’1″ partner both get a comfortable spray.
- Accessibility: seated or assisted bathing is far easier with an adjustable handheld.
- Cleaning: rinsing the tub, washing a dog, or detailing the shower walls is trivial.
- Resale appeal: a clean, modern slide bar reads as a thoughtful, updated bathroom.
What tools and parts do I need before I start?
You need a drill, the correct drill bit for your wall surface (a carbide or diamond bit for tile), a level, a measuring tape, a pencil, a Phillips screwdriver, plumber’s tape (PTFE thread tape), and the wall anchors plus screws that came with the kit. That’s genuinely it for most installs.
Here’s the realistic checklist before you drill a single hole:
- Slide bar kit (bar, two brackets, sliding holder, handheld head, hose).
- Drill + bits matched to your surface (see the table below).
- Carbide or diamond-tipped tile bit if you’re going into ceramic/porcelain.
- Level (a torpedo level or a phone level app works).
- Wall anchors — toggle or plastic expansion anchors if you can’t hit a stud.
- PTFE plumber’s tape for the hose and shower-arm threads.
- Masking tape to mark drill points and stop the bit from skating.
- Silicone caulk (clear, mildew-resistant) to seal the screw holes.
- Safety glasses — tile chips fly.
One spec to confirm: most handheld hoses and shower arms in the U.S. use a 1/2-inch NPT connection, and the standard slide bar length runs 24 to 36 inches. If you’re buying the kit and a new handheld separately, double-check the thread size so they mate cleanly. If you’ve ever shopped for a brass faucet with thread, this is the same idea — getting the thread standard right is what prevents a slow drip later.
How do I install a shower head slide bar step by step?
Install a shower head slide bar in seven steps: find your studs or plan anchors, mark the two bracket positions perfectly level, drill pilot holes, set anchors, screw the brackets on, attach the bar and slider, then connect the handheld and hose to the shower arm and test for leaks. Here’s each step in detail.
Step 1 — Decide placement and height
Position the bar so the top bracket sits around 72–78 inches from the shower floor and the bottom bracket about 24–36 inches below it, depending on bar length. Keep it within easy reach of the shower arm so the hose isn’t stretched taut. Stand in the shower and hold the bar up — make sure the highest slider position clears the tallest user’s head and the lowest position is comfortable for seated use.
Step 2 — Locate studs (or plan for anchors)
Run a stud finder across the wall. If a bracket lands on a stud, you can screw straight in for a rock-solid hold. In a tiled shower, you usually won’t hit studs at convenient spots, so you’ll rely on quality wall anchors rated for the bar’s weight plus the pull of someone yanking the handheld. That’s normal and perfectly safe when done right.
Step 3 — Mark and check level
Hold the bar against the wall at your chosen height. Mark the top bracket holes, set your level dead vertical (plumb), then mark the bottom holes. A bar that’s even 1/4 inch off vertical looks obviously crooked once mounted, so take the extra minute. Put a square of masking tape over each mark — it keeps your drill bit from wandering on slick tile.
Step 4 — Drill the holes
Use a carbide or diamond bit on tile and start slow with no hammer function until you punch through the glaze, then continue. Going full speed immediately is the number-one cause of cracked tiles. Once you’re through the tile and into the backer board or drywall, switch to a standard bit if needed and drill to the depth your anchor requires.
Step 5 — Set anchors and mount brackets
Tap the wall anchors flush, then screw the brackets on snugly — firm, not gorilla-tight (over-torquing cracks tile and strips anchors). Many kits have a decorative cover plate or escutcheon that snaps over each bracket to hide the screws.
Step 6 — Attach the bar and slider
Slide the adjustable holder onto the bar before seating the bar into both brackets — it’s easy to forget and then have to take it back apart. Secure the bar into the brackets per your kit (usually a set screw with a small hex key).
Step 7 — Connect the handheld and hose, then test
Wrap PTFE tape clockwise around the shower arm threads (2–3 wraps), hand-tighten the hose connector, then snug a quarter turn with a wrench if needed — using a cloth to protect the finish. Connect the other end of the hose to the handheld, clip the handheld into the slider, and turn the water on. Watch every joint for drips for a full minute. A weep at a threaded joint almost always means you need another wrap of tape, not more force.
Once it’s dry and solid, run a thin bead of clear silicone caulk along the top edge of each bracket where it meets the wall to keep water from sneaking behind the tile.
Should I drill into tile or mount without drilling?
Drill into tile for any permanent, weight-bearing slide bar — it’s the only method that reliably holds up to daily pulling on the handheld. Use a no-drill (adhesive or tension) option only for renters or temporary setups, and accept that it holds less weight and can let go over time, especially in a hot, steamy shower.
Here’s the honest comparison so you can pick the right approach for your situation:
| Mounting method | Best for | Holding strength | Wall risk | Typical longevity |
|---|---|---|---|---|
| Drilled into stud | Permanent install, heavy use | Excellent | Permanent holes | 10+ years |
| Drilled with wall anchors | Tiled showers, most homes | Very good | Permanent holes | 10+ years |
| Heavy-duty adhesive | Renters, light use | Moderate | None (may pull paint) | 1–3 years |
| Tension/suction | Temporary, no commitment | Low | None | Months |
If you’re a homeowner, drilling is the right call almost every time — the holes are tiny, hidden behind cover plates, and easily filled if you ever change the layout. If you rent, talk to your landlord; many are fine with a clean, well-caulked install since it adds value, and patching two small anchor holes at move-out is minor.
How do I avoid leaks and cracked tile (the two things that go wrong)?
Avoid leaks by always using PTFE thread tape and hand-tightening first, and avoid cracked tile by drilling slowly with a carbide bit and never over-torquing the screws. Those two habits prevent the vast majority of slide bar installation failures.
The leaks people get are almost never in the wall — they’re at the two threaded connections you make yourself: shower arm to hose, and hose to handheld. The fix is boring but reliable: clean threads, fresh PTFE tape wrapped in the direction the fitting turns, hand-tight plus a gentle nudge with a wrench. If you’d like a deeper sense of how threaded shower fittings can drip even when they look tight, the breakdown in our guide on a shower faucet that keeps running when turned off shows how worn seals and bad threads cause phantom water flow.
For cracked tile, the killers are: skipping the masking tape (bit skates and chips the glaze), using a regular bit instead of carbide/diamond, hammer-drilling from the first second, and cranking the mounting screws until the tile flexes. Go gentle and you’ll be fine.
One more pressure note: if your new handheld feels weak after install, the problem is usually the flow restrictor or a clogged aerator-style screen, not your plumbing. Mineral buildup is common in hard-water homes — the same reason you sometimes see discoloration, which we cover in why rust comes out of a faucet. A handheld with a good GPM flow rate spec will keep pressure strong while staying water-efficient.
What’s the difference between a slide bar and a fixed shower head setup?
A slide bar gives you a height-adjustable handheld on a rail, while a fixed shower head sprays from one permanent spot on the wall. The slide bar wins on flexibility and accessibility; the fixed head wins on simplicity and a slightly cleaner look. Many people install a slide bar precisely because it gives them both — a handheld they can dock high to use like a rain head, or pull down for targeted rinsing.
Quick way to decide: if only one adult uses the shower and you never rinse the tub or a pet, a fixed head is fine. If you have a mixed-height household, kids, accessibility needs, or you clean the shower often, the slide bar pays for itself in convenience the first week. And because installation taps your existing shower arm, switching from fixed to slide bar is a swap most people finish in an afternoon — far cheaper than a plumbing remodel. If budget is your main concern, our tips on saving money on faucet and fixture installation apply directly to DIY shower upgrades like this one.
How long does it take and how much should it cost?
A DIY slide bar install takes 45–90 minutes for most people and costs only the price of the kit — typically $40 to $200 depending on finish and quality — since you supply the labor. Hiring a handyman or plumber adds roughly $75–$200 in labor, mostly because of the drilling-into-tile step they’re insured to handle.
Where the money difference shows up is in build quality. A cheap kit with a thin chrome-plated plastic bar and a flimsy slider will look fine on day one and wobble within a year. A solid brass or stainless bar with a quality finish holds up to daily yanking and steam. If you’re weighing materials, our comparison of brass vs. zinc fixtures and which lasts longer explains why heavier metal hardware survives the wet, humid shower environment so much better than budget alloys.
Author note & brand credibility
This guide was written by the wewefaucet product and installation team, drawing on hands-on testing of handheld shower systems and slide bars across real bathroom installs — tile, fiberglass surround, and stud-backed drywall. At wewefaucet (www.wewefaucet.net) we design and sell faucets and shower fixtures built to meet U.S. plumbing standards, including cUPC/NSF compliance and lead-free wetted-surface requirements, and we back our shower hardware with manufacturer warranty coverage. We’ve installed and pressure-tested these systems ourselves, so the steps above reflect what actually works on a Saturday morning — not just what the box says. If you want to understand warranty fine print before you buy, our plain-English breakdown of faucet warranty terms is worth a read.
FAQ
Do I need a plumber to install a shower head slide bar?
No. Because a slide bar connects to your existing shower arm rather than the water pipes inside the wall, it’s a DIY-friendly job. The only “skilled” part is drilling cleanly into tile, which a careful homeowner with a carbide bit can handle. If your shower is fiberglass or acrylic and you’re nervous about drilling, a handyman can do it in under an hour.
How high should a shower slide bar be mounted?
Mount the top bracket about 72–78 inches above the shower floor and the bottom bracket 24–36 inches below, depending on the bar’s length. This range lets the slider reach above the tallest user’s head and drop low enough for kids or seated bathing. Always hold the bar in place and test the slider’s top and bottom positions before drilling.
Can I install a slide bar without drilling into the wall?
Yes, with heavy-duty adhesive or tension-mount kits, but they hold less weight and tend to loosen over time in a hot, steamy shower. No-drill options are best for renters or temporary setups. For a permanent, daily-use install, drilling into a stud or using rated wall anchors is far more reliable.
What size connection do shower head hoses use?
Almost all U.S. handheld shower hoses and shower arms use a standard 1/2-inch NPT threaded connection, so most kits are universally compatible. Always confirm the thread size if you’re mixing a separate handheld with your slide bar kit, and use PTFE plumber’s tape on the threads to seal the joint.
Why is my handheld shower head leaking after installation?
It’s almost always a threaded connection that needs more plumber’s tape, not a wall plumbing problem. Disconnect the hose, clean the threads, wrap 2–3 turns of fresh PTFE tape in the direction the fitting tightens, then hand-tighten plus a gentle quarter turn with a wrench. Forcing the joint harder rarely fixes it and can crack the fitting.
Will a slide bar reduce my water pressure?
The slide bar itself doesn’t affect pressure — it’s just a rail. Any pressure drop comes from the handheld head’s flow restrictor or a clogged spray screen. Choose a handheld with a solid GPM rating and soak the spray face in vinegar periodically if you have hard water, and your pressure will stay strong.
您好!please sign in