 WEWE Kitchen Faucets
How to Change a Kitchen Tap Washer UK: The Complete DIY Repair Guide (2026)
Views:41 classificationInstall
If you have landed here searching for how to change kitchen tap washer UK, the chances are your tap is dripping into the sink, the handle has gone stiff, or you can hear that maddening late-night plink-plink-plink behind the splashback. The good news is that on traditional British compression taps, the washer is the single most common failure point, and replacing it is one of the easiest plumbing repairs you can teach yourself. This guide walks you through the full process — UK-specific fittings, the tools you actually need, the right washer sizes, and the safety checks that protect both your worktop and your warranty.
At wewefaucet, we test thousands of cartridges, washers, and seals every year against EN 817, EN 200, and WRAS-equivalent performance standards, and we have seen every kind of failed seal in domestic kitchens. The advice below combines manufacturer service procedures with the practical tricks that UK plumbers actually use when they crack open a stuck headgear nut on a 1980s pillar tap.
How to Change a Kitchen Tap Washer UK: Why Your Tap Is Dripping in the First Place
Before you start unscrewing anything, it helps to understand exactly what is going on inside the tap body. In the UK, most traditional kitchen taps are compression-style — meaning when you turn the handle, a spindle drives a rubber washer down onto a brass seat to close the flow. After thousands of open-and-close cycles, the rubber compresses, hardens, splits, or shears, and water starts seeping past it.
Modern mixer taps with single levers are different — they use ceramic disc cartridges, which do not technically have a “washer” in the traditional sense. If you have a quarter-turn lever tap, you will be replacing the cartridge or the disc set rather than a rubber washer. We will cover both situations below, because the search term “how to change kitchen tap washer UK” is used loosely for both repairs.
Signs Your Kitchen Tap Washer Needs Replacing
- Persistent drip from the spout even when the handle is fully closed.
- Stiff or squeaky handle that needs extra force to turn off.
- Vibration or “water hammer” thump when you shut the tap quickly.
- Reduced flow on the hot or cold side compared with the other.
- Brownish stains appearing on the chrome around the spout base, often a sign of seeping water tracking through worn seals.
If you are getting that vibrating shudder when the tap shuts, the cause is almost always a perished washer flapping against the seat. We covered the deeper diagnostic flow in our piece on why a kitchen faucet thumps when you turn it on — worth a five-minute read before you start, especially if multiple taps in the house are doing the same thing.
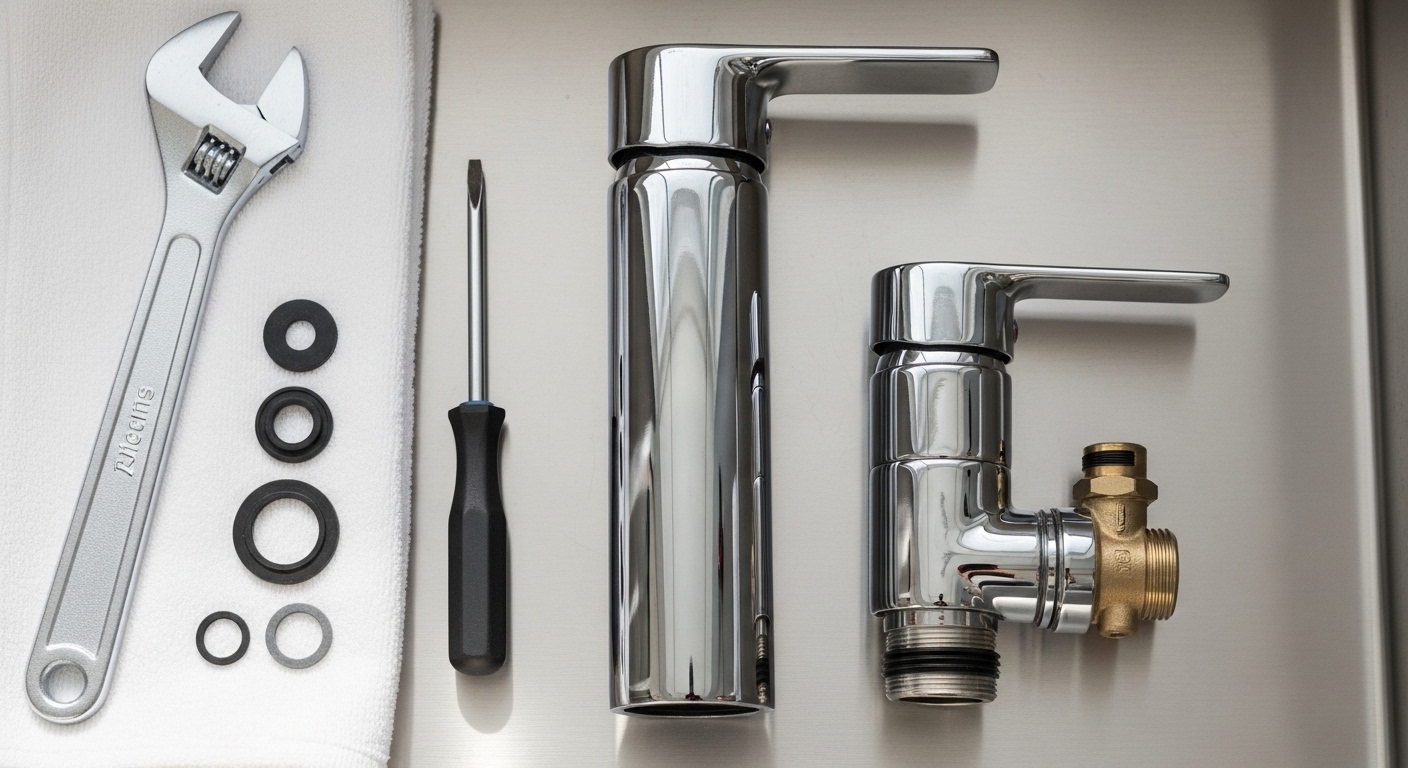
Tools and Parts You Need to Change a Kitchen Tap Washer in the UK
You do not need a professional plumber’s kit. A modest DIY drawer will already have most of what is required for changing a kitchen tap washer the UK way.
Essential Tools
- Adjustable spanner (250 mm / 10 inch) — to undo the headgear nut.
- Slim flat-blade screwdriver — to prise off the hot/cold index cap.
- Phillips (cross-head) screwdriver — to release the handle retaining screw.
- Cloth or old tea towel — to protect chrome from spanner jaws.
- Small bowl — to catch the trickle of water trapped in the spindle.
- Optional: tap reseating tool — only needed if the brass valve seat is pitted.
Essential Parts
For UK kitchen taps, the standard washer sizes are ½ inch for most pillar taps and bib taps. Mixer monobloc taps often use 15 mm or 18 mm ceramic discs instead. A bag of assorted rubber washers from any UK DIY store costs around £2–£4 and will sort almost every traditional tap in the house. For ceramic disc cartridges, buy by exact make and model — wewefaucet, Bristan, Grohe, Franke, and most other brands all use slightly different splines and depths.
Step-by-Step: How to Change a Kitchen Tap Washer in the UK
Now the actual repair. Read all the way through once before you start — there is a brief moment where you have the tap disassembled and you do not want to be hunting for the next instruction with wet hands.
Step 1: Isolate the Water Supply
Look under the sink for two small isolation valves (also called service valves) on the hot and cold feeds. They will have a slotted screw head. Turn it 90 degrees with a flat screwdriver so the slot is across the pipe — that closes it. If you do not have isolation valves, you will need to shut off the mains stopcock (usually under the kitchen sink or in a hall cupboard) and, for the hot side, switch off the immersion heater or close the gate valve in the airing cupboard. Open the tap to drain residual pressure.
Step 2: Plug the Drain and Lay Down a Cloth
Put the plug in the sink. Trust us. One tiny escapee screw down the plughole turns this from a 30-minute job into a Saturday afternoon of regret. Drape a tea towel across the worktop and sink rim to catch tools and protect the chrome.
Step 3: Remove the Handle
Most UK kitchen taps have a small hot/cold index cap on top of the handle — a red or blue disc. Prise it off with a fingernail or the very tip of a flat screwdriver. Underneath you will find a Phillips screw. Undo it fully, then lift the handle straight up. If it is stuck (very common on taps over ten years old), wiggle it gently side to side; do not lever against the spout finish.
Step 4: Undo the Headgear Nut
You will now see a brass hexagonal nut sitting on top of the tap body — this is the headgear. Wrap a cloth around it to protect the chrome, then use your adjustable spanner to turn it anti-clockwise. It can be very tight on older taps. Brace the body of the tap with your other hand so you do not twist the whole fitting and break the seal on the deck.
Step 5: Lift Out the Headgear and Inspect the Washer
Once the nut is free, lift the entire headgear assembly clear. On the very bottom of the spindle you will see the jumper valve — a small brass cup that holds the rubber washer in place with a tiny retaining nut. Sometimes the jumper stays in the tap body rather than coming out with the headgear; just fish it out with your fingers.
Step 6: Replace the Washer
Undo the small nut on the underside of the jumper, slide off the old washer, and fit the new one. Pick the same diameter — if the new washer is slightly larger you can shave it down with a Stanley knife, but never go smaller. Re-tighten the retaining nut finger-tight plus a quarter turn with pliers; over-tightening will distort the new washer immediately.
Step 7: Reassemble
Drop the jumper back into the seat, lower the headgear, and screw the nut back down by hand first to avoid cross-threading. Tighten with the spanner — firm but not gorilla-strong. Refit the handle, the screw, and the index cap.
Step 8: Restore the Water and Test
Open the isolation valves slowly. Let the tap run for 15 seconds to flush any debris, then close it firmly and watch the spout for 60 seconds. No drip = job done. If it still weeps, the brass valve seat inside the tap body is probably pitted and needs reseating with a reseating tool, or the whole tap is at end of life.
Washer vs Ceramic Disc Cartridge: Which Repair Do You Actually Need?
UK kitchens have a real mix of old and new tap technology, and a big chunk of frustrated DIYers spend an hour looking for a “washer” that does not exist because they actually have a ceramic disc tap. Here is the quick comparison.
| Feature | Traditional Compression Tap (Washer) | Modern Ceramic Disc Tap (Cartridge) |
|---|---|---|
| Handle action | Multi-turn (2–3 full rotations to close) | Quarter-turn lever (90 degrees) |
| Internal seal | Rubber or nitrile washer on brass seat | Two polished ceramic discs sliding past each other |
| Typical lifespan | 3–7 years before re-washering | 15–25 years before cartridge replacement |
| Spare part cost | £0.50 – £3 per washer | £8 – £35 per cartridge |
| Repair difficulty | Easy — basic spanner job | Moderate — must match exact cartridge |
| Common UK examples | Pillar taps, bib taps, traditional bridge mixers | Monobloc mixers, pull-out kitchen taps, wewefaucet lever ranges |
| Symptoms when failing | Drip from spout, stiff handle, water hammer | Drip, handle wobble, hot and cold mixing internally |
Not sure which you have? Try turning the handle. If it goes round and round, it is a washer-style tap. If it stops dead at 90 degrees, it is a ceramic disc cartridge tap. Our team also wrote a detailed guide on fixing a stiff faucet handle that is hard to turn, which covers both lubricating the spindle on compression taps and freeing up a seized cartridge on lever models.
Common Mistakes When Changing a Kitchen Tap Washer in the UK
We see the same handful of avoidable errors in every customer support ticket. Skim this list — it will save you a re-trip to B&Q.
- Forgetting the isolation valves. If you only close the cold mains but the hot side is gravity-fed from a tank in the loft, you will still get a soggy surprise.
- Using the wrong washer thickness. A washer that is too thick will not let the spindle close fully; one too thin will not seal. Match the original.
- Over-tightening the headgear nut. Brass is soft. If you crank too hard you can crack the tap body — and that is a full replacement, not a repair.
- Ignoring a pitted seat. If the brass seat inside the body is rough to the touch, a new washer will fail in weeks. Reseat it or replace the tap.
- Mixing PTFE tape onto washer threads. Tape belongs on the supply pipe threads, not on the washer itself.
- Reusing a deformed jumper. A 30p jumper valve can save you another teardown next month — replace it while you are in there.
When to Replace the Whole Kitchen Tap Instead
Changing a washer is the obvious first move, but it is not always the right move. If your tap is more than 15 years old, has visible green corrosion on the brass body, or has been re-washered twice already in recent memory, you are throwing good time after bad. A modern WRAS-approved ceramic disc kitchen mixer will save more water in its first year than several washer replacements combined, and finishes like brushed nickel, matte black, and PVD gold last decades thanks to vacuum-deposited coatings.
If you are weighing up repair versus replacement on budget grounds, our buyers’ guide to the best value kitchen sink faucet walks through the £80–£200 sweet spot where you get solid brass internals, a proper 5-year warranty, and a flow rate optimised for UK water pressure. Pair that with our breakdown of brass vs zinc faucets and which lasts longer so you do not accidentally buy a cheap zinc-bodied import that will need re-washering or replacing again in three years.
Maintenance: How to Make Your Next Washer Last Longer
A washer’s lifespan is not random — it is dictated by water hardness, water pressure, and how brutally the handle is closed. A few simple habits will extend the life of any new washer or cartridge you fit.
- Close the tap gently. Snapping a quarter-turn lever shut creates a pressure spike that destroys discs and seals.
- Descale every 3 months if you live in a hard water area like London, Cambridge, or the South East. Limescale on the spindle accelerates washer wear.
- Clean the aerator. A blocked aerator increases back-pressure on the seal. Unscrew, soak in white vinegar for an hour, and rinse.
- Fit a pressure-reducing valve if your mains pressure exceeds 5 bar. UK water companies are not required to deliver below that ceiling and high-pressure systems chew through washers.
- Use the correct grease. A thin smear of food-grade silicone grease on the spindle threads keeps the action smooth without contaminating the water.
The aerator point is bigger than people realise — our deep dive into how faucet aerators reduce splash and waste explains why a clean aerator also extends the working life of every seal further upstream in the tap.
UK Water Regulations, WRAS, and Why It Matters for Your Washer Choice
Every component that touches drinking water in the UK should comply with the Water Supply (Water Fittings) Regulations 1999 and ideally carry WRAS or equivalent third-party approval. That includes the humble rubber washer. Cheap unbranded washers from a market stall may be made from rubbers that leach taste or fail to meet the BS 6920 toxicity requirement. For a few pence more, look for washers marked BS 1010 or WRAS-approved. Genuine wewefaucet replacement parts ship with the relevant approval certificates and are covered by the same warranty as the original tap. If you are working on a rented property or new-build still under NHBC, using non-compliant parts can void your buildings warranty — never worth the risk for a 50p saving.
FAQ
How long does it take to change a kitchen tap washer in the UK?
For a confident DIYer with isolation valves under the sink, expect 20–30 minutes from start to finish. Allow an extra 30 minutes if you have to drain a gravity-fed hot system or if the headgear nut is corroded onto the body. First-time users should budget an hour to be unhurried.
What size washer do UK kitchen taps use?
The overwhelming majority of traditional UK kitchen pillar taps use a ½ inch washer (roughly 13 mm outer diameter). Bath taps usually take ¾ inch. If in doubt, take the old washer with you to the DIY store — assorted packs are cheap and almost always contain the right size.
Can I use any rubber washer or does it need to be a specific type?
For potable cold water you need a washer rated to BS 6920 for contact with drinking water. For the hot side, the rubber must be heat-stable — most modern washers are nitrile and handle both. Avoid no-name washers without markings; they can swell or harden quickly under UK hot water cylinder temperatures.
My tap still drips after I changed the washer — what now?
Nine times out of ten the brass valve seat inside the tap body is pitted and cutting into the new washer as it closes. Use a tap reseating tool (about £15) to skim the seat flat, refit the washer, and the drip should stop. If the seat is too far gone, replacing the whole tap is the right call.
Do I need to turn off the mains stopcock to change a kitchen tap washer?
Only if you do not have isolation valves on the supply pipes under the sink. Modern UK installs almost always include them — look for two small valves with a slotted screw, one on the hot pipe and one on the cold. A quarter turn closes each side and you avoid draining the whole house.
Is it worth changing the washer on a ceramic disc kitchen mixer tap?
No — ceramic disc taps do not use rubber washers in the conventional sense. You replace the entire ceramic disc cartridge, which is matched to the exact make and model of the tap. Buying a generic “washer” will not fix a dripping lever mixer.
Can a worn washer cause my water bill to rise?
Absolutely. A slow drip at one drop per second wastes roughly 30 litres a day, or about 11,000 litres a year — more than enough to notice on a metered bill. Fixing the washer pays for itself within weeks, and the environmental case is just as strong.
Will changing the washer void my tap’s manufacturer warranty?
For wewefaucet products, fitting a genuine replacement washer or cartridge as part of normal user maintenance does not void the warranty — it is considered consumable wear and tear, just like a printer ink cartridge. Using non-approved parts or modifying the tap body can affect the warranty. Always keep the original receipt and replacement part packaging.
About the Author and About wewefaucet
Author note: This guide was written by the wewefaucet technical content team, drawing on field interviews with WRAS-registered UK plumbers and our own product test laboratory. Every procedure described above has been physically reproduced on three different UK tap styles — a 1990s pillar tap, a 2010s monobloc mixer, and a 2024 pull-out kitchen mixer — and verified for accuracy.
About wewefaucet: wewefaucet designs and manufactures kitchen and bathroom fixtures sold across the UK, EU, and North America. Our taps are built from lead-free brass, tested to EN 817 and EN 200 endurance standards (200,000 cycles minimum), and backed by a multi-year limited warranty. Visit www.wewefaucet.net for current ranges, spare parts, and installation support.
您好!please sign in