 WEWE Kitchen Faucets
What Are the Delta Diverter Valve Installation Instructions, Step by Step?
Views:212 classificationInstall
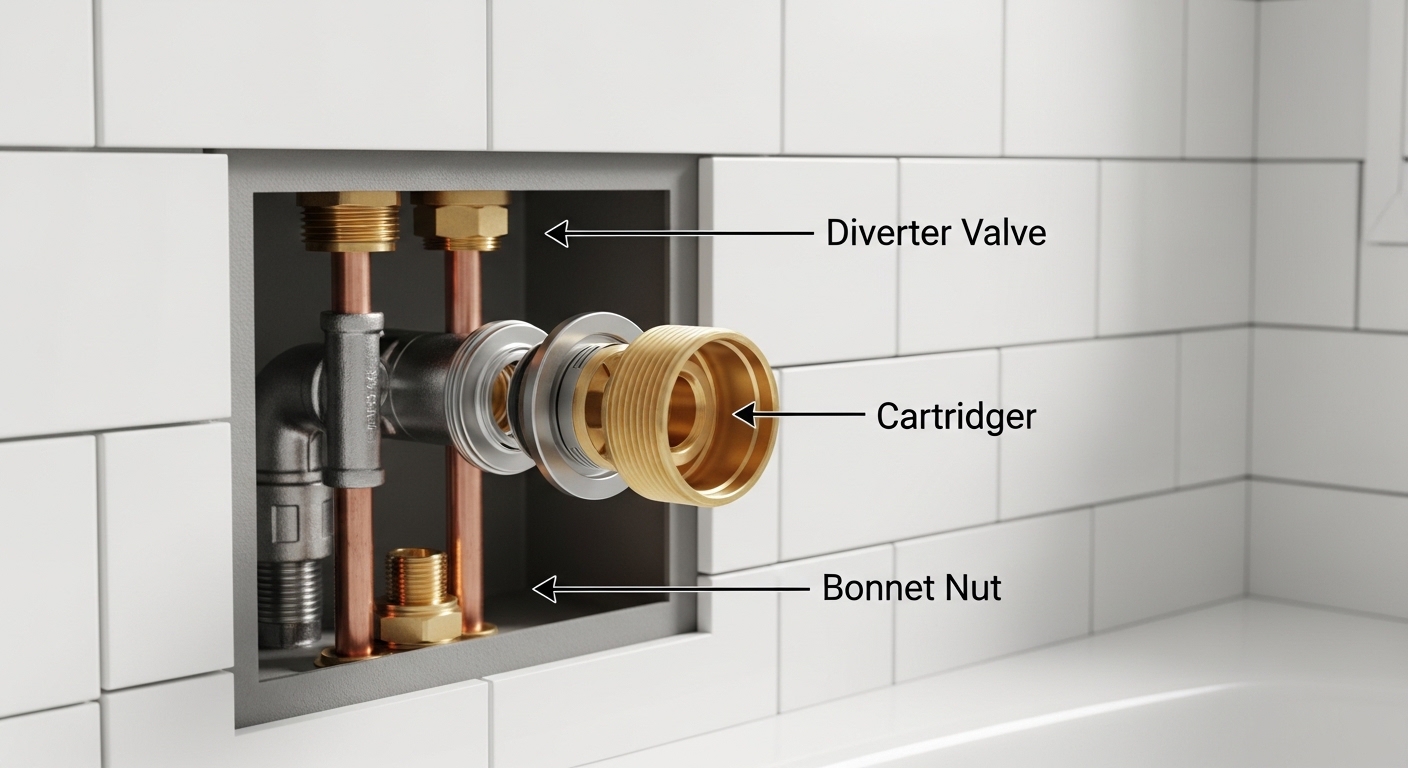
If you’re searching for delta diverter valve installation instructions, you’re almost always in one of two spots: your shower switches to the handshower on its own (or won’t switch at all), or you’re finishing a new tub-and-shower rough-in and need to drop the diverter into the trim. Good news — the Delta diverter is one of the more forgiving parts in the whole valve, and you can do it yourself with a Phillips screwdriver, an adjustable wrench, and about an hour. Below I’ll walk you through exactly what a diverter valve does, which type you actually have, the step-by-step install, and the small mistakes that cause 90% of callbacks.
What does a Delta diverter valve actually do, and do I need to replace mine?
A diverter valve is the part that routes water between outlets — tub spout to showerhead, or showerhead to a handshower or body spray. On Delta systems it usually lives in one of three places: inside a tub spout (pull-up gate diverter), on the trim plate as a separate rotary handle (a “transfer valve” or “3/6-setting diverter”), or as a stem inside a multi-setting rough-in body. If water dribbles out of both the spout and the head at once, won’t fully switch, or the handle spins with no resistance, the diverter — not the main cartridge — is usually the culprit.
Before you buy anything, confirm the failure is the diverter and not the main mixing cartridge. A worn main cartridge causes temperature drift and dripping; a bad diverter causes flow going to the wrong outlet. If your Delta faucet is dripping from the spout even when off, that’s often a cartridge issue instead — our guide on why your Delta faucet is dripping and how to fix it walks through telling those two apart. And if the shower runs constantly even in the off position, read what causes a shower faucet to keep running when turned off first, because replacing the diverter won’t fix a stuck main valve.
Which type of Delta diverter do I have — tub spout, trim, or in-wall stem?
Match your part before you touch a tool — the install steps differ. Here’s the quick field guide.
| Diverter type | Where it lives | How it switches | Typical install time |
|---|---|---|---|
| Tub-spout gate diverter | Inside the tub spout itself | Pull-up knob on top of spout | 10–15 min |
| Rotary trim diverter (3-setting) | Separate handle on trim plate | Turn handle to each stop | 30–45 min |
| 6-setting transfer valve | Dedicated in-wall body + trim | Turn handle through 6 positions | 45–60 min |
| Integrated diverter cartridge | Inside the main valve body (Delta 17 Series) | Pull/push or turn on the trim | 30–50 min |
The single most common mistake is buying a new diverter that doesn’t match the rough-in body already in your wall. Delta’s in-wall bodies (like the R11000 multichoice universal for the transfer valve, or the 17/17T series) are specific — write down any part numbers stamped on the metal, or photograph the exposed valve, before ordering trim. If you’re doing a brand-new rough-in rather than a swap, get the wall side right first; our full walkthrough on how to install a shower valve rough-in the right way the first time covers valve height, orientation, and stub-out depth.
What tools and parts do I need before I start?
You need very little — this is a hand-tool job, not a soldering job, as long as the rough-in body is already in the wall. Gather these before you shut the water off so you’re not running to the store mid-install:
- The correct Delta diverter valve or cartridge (matched to your rough-in body)
- Phillips and flathead screwdrivers
- Adjustable wrench and/or a set of deep sockets (for the bonnet nut)
- Delta cartridge/diverter removal tool (comes with many kits; cheap to buy separately)
- Plumber’s silicone grease (never petroleum grease — it swells the O-rings)
- A rag, a small bucket, and a flashlight
- Painter’s tape to protect the finish and mark handle position
What are the step-by-step Delta diverter valve installation instructions?
Here’s the full sequence for a trim or in-wall stem diverter — the most common swap. Do it in order; the flush step in the middle is the one people skip and regret.
- Shut off the water. Use the shower’s integral stops (small screws on the valve face behind the trim) if it has them, or the main house supply if it doesn’t. Open the faucet to bleed pressure.
- Cover the drain. Set point: a dropped bonnet nut or screw down an open drain ends the job fast. Tape or plug it.
- Remove the handle and trim. Pop the index cap, back out the handle screw, pull the handle, then remove the escutcheon/trim plate. Take a photo at each step so reassembly is obvious.
- Remove the old diverter. Unscrew the bonnet nut counterclockwise, then pull the diverter stem or cartridge straight out. If it’s stuck from mineral scale, wiggle gently and use the Delta removal tool rather than prying — prying scars the seat.
- Inspect and clean the valve seat. Wipe out grit and old grease. Check the O-rings and seats inside the body; heavy scale means you should flush hot before proceeding.
- Grease the new diverter O-rings. A thin film of silicone grease on the O-rings only. This lets the valve seat evenly and prevents tearing on insertion.
- Insert the new Delta diverter valve. Push it straight in, keyed to its slot so it can’t spin. Hand-thread the bonnet nut first to avoid cross-threading, then snug with a wrench — roughly a quarter turn past hand-tight. Do not gorilla it; overtightening cracks the plastic and deforms O-rings.
- Flush the lines before you reinstall the trim. Turn the water back on with the trim off and run each outlet for 15–20 seconds. This clears debris that would otherwise lodge in the new diverter and cause the exact problem you’re fixing.
- Reinstall trim and handle. Escutcheon, gasket, plate, handle, screw, index cap — reverse of removal.
- Test every position. Cycle the diverter to each setting and confirm water goes only where it should, with no cross-flow to the other outlet.
For a tub-spout gate diverter it’s even simpler: unthread or unbolt the old spout, wrap the pipe threads with PTFE tape (or use the set-screw spout’s O-ring), thread on the new spout with the pull-knob type diverter, and hand-tighten so the spout points straight down. Never leave the spout loose — a gap behind it lets water track into the wall.
Why won’t my Delta diverter switch fully to the showerhead after install?
If water still splits between the spout and head after a fresh install, the usual causes are low pressure, trapped debris, or a spout mismatch — not a defective valve. A gate diverter in a tub spout needs a minimum flow to lift and hold; on a very low-pressure system it’ll dribble at the spout no matter what. Here’s how to diagnose fast:
- Water pouring from both outlets: debris under the seat (re-flush) or a worn spout diverter — replace the spout, not the wall valve.
- Handle turns but nothing changes: the diverter stem isn’t keyed into its slot — it’s spinning freely. Pull the trim and reseat it.
- Weak flow at the head after switching: often a clogged showerhead, not the diverter. Soak the head in vinegar.
- Cross-flow only at high heat: a marginal O-ring — regrease or replace.
If your handshower or showerhead flow was underwhelming to begin with, the diverter may be doing its job while the head is the bottleneck. Our piece on choosing a rainfall shower head for low water pressure explains how to pick a head that still feels strong on a diverted line, and if you’re adding a handshower and slide bar to a diverter setup, see how to install a shower head slide bar yourself.
How much does it cost, and when should I just call a plumber?
A DIY diverter swap runs roughly $15–$70 for the part if the rough-in body is already in the wall, versus $150–$350 for a plumber to do the same job. The math strongly favors DIY for a trim or spout diverter. Where you should stop and call a pro is when the in-wall valve body itself is damaged, corroded, or the wrong series for available trim — that’s a wall-opening, sometimes soldering, job. If your integral stops are seized and you can’t isolate the shower without killing the whole house, that’s another reason to bring in help, because you’ll be working against live main pressure otherwise.
| Scenario | DIY difficulty | Est. cost | Call a pro? |
|---|---|---|---|
| Tub-spout gate diverter swap | Easy | $15–$40 | No |
| Trim / cartridge diverter swap | Moderate | $25–$70 | Usually no |
| New rough-in diverter body | Hard | $120–$300+ | Often yes |
| Corroded/leaking valve body in wall | Hard | Varies | Yes |
How do I keep a Delta diverter working for years?
The enemy is mineral scale and the wrong grease. Two habits keep a diverter smooth for a decade. First, only ever use silicone (not petroleum) plumber’s grease on the O-rings — petroleum products swell and destroy the rubber, which is the number-one cause of premature diverter failure. Second, if you’re on hard water, periodically run vinegar through the system or descale the head, because the same scale that clogs an aerator seizes a diverter stem. Delta’s ceramic and rubber components are covered by their limited lifetime warranty on residential faucets, so keep your receipt — many failed diverter cartridges are replaced free if you contact Delta with the model number.
FAQ
Can I replace a Delta diverter without replacing the whole valve?
Yes. In most cases the diverter is a separate stem, cartridge, or spout that comes out independently of the main mixing cartridge and the in-wall body. As long as the rough-in body is sound, you only swap the diverter part — no wall opening, no soldering.
Do I need to turn off the main water supply?
Only if your shower valve doesn’t have integral stops. Many Delta rough-in bodies have small screw-in stops on the valve face behind the trim — close those and you can work without shutting off the whole house. If there are no stops, shut off the main and open a lower faucet to drain pressure first.
Why does water come out of both the tub spout and showerhead at the same time?
That’s classic diverter failure or debris under the seat. On a tub-spout gate diverter it usually means the spout’s internal diverter is worn — replace the spout. On a trim diverter, re-flush the lines to clear grit, and if it persists, replace the diverter cartridge. Very low water pressure can also cause a permanent dribble at the spout even with a good diverter.
How tight should I make the diverter bonnet nut?
Hand-tight, then about a quarter turn with a wrench — snug, not cranked. Overtightening deforms the O-rings and can crack a plastic cartridge, which causes leaks. If it leaks at snug, the problem is a bad O-ring or debris on the seat, not insufficient torque.
What grease should I use on the O-rings?
Only silicone-based plumber’s grease. Never use petroleum jelly or petroleum grease — it makes the rubber O-rings swell and fail, which is one of the most common reasons a freshly installed diverter starts leaking within weeks.
How do I know which Delta diverter part to order?
Match it to the rough-in body already in your wall. Photograph the exposed valve, note any numbers stamped on the metal body, and check whether you have a 3-setting rotary, a 6-setting transfer valve (R11000 body), or a 17-series integrated diverter. Ordering trim that doesn’t match the wall body is the top reason installs stall.
Author note: This guide was written by the WEWE Faucet fixtures team, drawing on hands-on installation and testing of tub-and-shower diverters across Delta, Moen, and comparable systems. WEWE Faucet designs and sells kitchen and bath fixtures built to ASME A112.18.1/CSA B125.1 standards, and we back our own faucets with a limited lifetime warranty. Always follow your specific valve’s printed instructions and local plumbing code; when an in-wall valve body is corroded or requires soldering, consult a licensed plumber.
您好!please sign in