 WEWE Kitchen Faucets
Wall Mounted Faucet Elevation CAD Block: The Complete Spec & Drafting Guide for Designers (2026)
Views:33 classificationProduct
If you’re a designer, architect, or specifier hunting for a reliable wall mounted faucet elevation CAD block, you’ve likely discovered that the symbols floating around the internet are wildly inconsistent—wrong spreads, missing centerlines, no rough-in callouts, and projections that don’t match any real product. That’s a problem because the elevation block is the single most important drafting reference your plumber will use to set the valve body inside the wall. Get it wrong, and you’re tearing out drywall after fixtures arrive. This guide walks you through what a proper wall mount faucet elevation block must contain, where to download the right files, how to vet them against manufacturer cut sheets, and how WEWE Faucet supplies our commercial accounts with manufacturer-verified CAD content for every wall-mount model we sell.
What Is a Wall Mounted Faucet Elevation CAD Block?
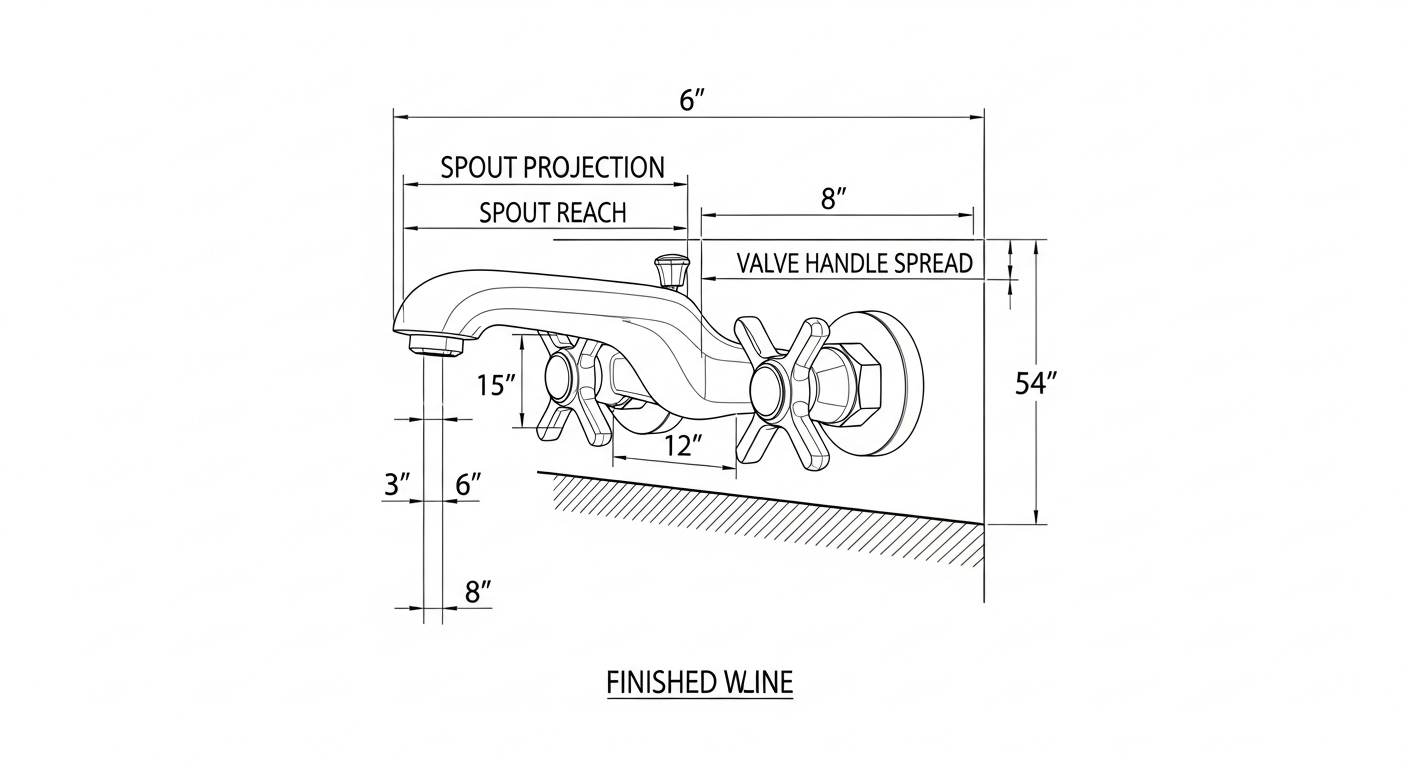
A wall mounted faucet elevation CAD block is a vector drafting object—usually saved as a .DWG, .DXF, or Revit family (.RFA)—that represents the front-facing (elevation) view of a wall-mount lavatory or kitchen faucet. Unlike a plan-view symbol, which only tells the plumber where the fixture sits along the wall, the elevation block tells them at what height the rough-in stub-outs should land, how far the spout will project past the finished wall, and where the trim plate will cover the valve. For commercial specifiers writing construction documents, this block is non-negotiable: every interior elevation sheet that includes a wall-mount faucet must show the fixture drawn to scale with accurate dimensional callouts.
Proper elevation blocks contain four critical layers of information. First, the geometric outline of the trim—spout, handle(s), escutcheon or mounting plate—drawn at the manufacturer’s actual dimensions. Second, the centerline of the spout and the centerlines of each valve handle, dashed and labeled. Third, the finished-wall line (the face of tile or stone, not the rough framing), because faucet projection is always measured from finish, not substrate. Fourth, dimensional callouts for spread (distance between handle centers), reach (spout projection), and height above counter or rim of the basin. A block missing any of these four layers should be rejected.
Why Commercial Projects Demand Manufacturer-Verified CAD Blocks
On a residential remodel, you can sometimes get away with a generic CAD block because the homeowner is forgiving and the plumber will adapt on site. On a commercial project—hotel, office, healthcare, multifamily, hospitality—you can’t. The drawings are contractually binding. If the elevation block shows a 9-inch spread and the installed faucet has an 8-inch spread, the punch list will catch it, and somebody is rebuilding the wall on their dime. That’s why architectural firms specifying for hospitality, healthcare, or large multifamily projects insist on CAD blocks supplied directly by the faucet manufacturer, traceable to a specific SKU.
There’s also a coordination angle. Wall-mount faucets sit inside the wall cavity, which means they have to coexist with framing, blocking, vapor barriers, tile substrate, in-wall carrier systems (for wall-hung lavatories), and sometimes structural steel. The elevation block tells the architect, the structural engineer, the plumber, and the tile contractor exactly how much depth the valve body needs and how high the stub-outs land—so blocking gets installed in the right place before the drywall goes up. Skip this and you’ll be cutting access panels into finished tile.
Anatomy of a Proper Wall Mounted Faucet Elevation CAD Block
Let’s break down what every usable wall mounted faucet elevation CAD block should include. Whether you’re downloading a free block from an online library or sourcing one directly from a manufacturer like WEWE Faucet, run through this checklist before dropping it into your sheet.
1. Scaled Geometry at 1:1
The block should be drawn at full scale (1:1), with all linework matching the real fixture’s outside dimensions. If the cut sheet says the spout projects 6.5 inches from the finished wall, the block geometry should measure 6.5 inches at full scale. You’ll plot it at 1/2″=1′-0″ or 3/8″=1′-0″ on the sheet, but the underlying geometry must be true-scale so dimensions read correctly.
2. Layer Organization
Quality CAD blocks separate geometry by layer—visible linework on one layer, hidden lines (valve body inside wall) on another, centerlines on a third, dimension strings on a fourth, and notes on a fifth. This lets you freeze or thaw layers depending on what the sheet is showing. A block where every line is on layer “0” is amateur work; reject it.
3. Insertion Point
The insertion point should land at the centerline of the spout where it meets the finished wall face. This is the point your plumber will dimension from. If the block inserts from the top-left corner of the bounding box or some other arbitrary spot, you’ll waste time relocating it on every sheet.
4. Attribute Data
The best CAD blocks include attributes—editable text fields—for the model number, finish code, spread dimension, and rough-in valve height. When you drop the block onto a sheet, you fill in the attributes and they auto-populate your fixture schedule. This is how large firms keep schedules in sync with elevations without manual re-typing.
5. A Labeled Finished-Wall Line
Because faucet projection is measured from the face of tile or stone (not the rough framing), every elevation block should include a heavy line marking “FACE OF FINISHED WALL” with the projection dimension running from that line to the spout outlet. Without it, plumbers will sometimes measure from the drywall and end up with a faucet that’s an inch too close to the basin.
File Formats: DWG vs. DXF vs. Revit Family
Not every CAD block is delivered in the same format, and the format you need depends on what software your team uses. Here’s a quick comparison of the three formats commonly used for wall-mount faucet elevation blocks, plus when to choose each.
| Format | Native Software | Best For | Limitations | Typical File Size |
|---|---|---|---|---|
| .DWG | AutoCAD, BricsCAD | 2D construction documents, interior elevations, plumbing drawings | Version-dependent; AutoCAD 2018 can’t open 2024 files unless saved back | 40–200 KB |
| .DXF | Universal exchange format | Sharing geometry between different CAD platforms (SketchUp, Vectorworks, ArchiCAD) | Larger files, sometimes loses block attributes on conversion | 100–500 KB |
| .RFA (Revit Family) | Autodesk Revit | BIM workflows; 3D coordination with plumbing, structure, and MEP | Heavier file; requires correct host family (wall-hosted vs. face-hosted) | 500 KB–3 MB |
| .IFC | Open BIM exchange | Cross-platform BIM coordination on large commercial jobs | Limited parametric flexibility once exported | 1–5 MB |
| .SKP | SketchUp | Design-development renderings and client presentations | Not suitable for construction documents | 500 KB–2 MB |
For most US commercial projects we see at WEWE Faucet, the standard delivery is a .DWG block for elevation sheets plus a Revit family for BIM coordination. If your firm is still on AutoCAD LT or one of the alternative 2D CAD platforms, the .DXF format is your safest universal bet.
How to Vet a Free CAD Block Before You Use It
Plenty of websites offer free CAD blocks of faucets, sinks, and tubs. Some are excellent; most are not. Before you build a set of construction documents around a free download, run it through this verification sequence:
- Open it in your CAD program and run a DIST command across the spout reach. Compare that measurement to a real manufacturer cut sheet for a comparable wall-mount faucet. If the block reads 7 inches but every comparable real faucet reads 5–6.5 inches, the block is fictional.
- Check the layer list. A free block dumped onto layer “0” with no organization is a red flag. Skip it.
- Look for an insertion base point. Run the BASE command or check block properties—if the base point is at the corner of the bounding box rather than the spout centerline at finished wall, you’ll waste time on every sheet.
- Confirm the block has both elevation and plan views, if needed. Some libraries package both; others only give you elevation. For a full sheet set you need both views to agree dimensionally.
- Verify there’s no embedded company branding or watermark. Some “free” CAD libraries embed visible text or logos into the block that will appear when plotted.
- Compare against a manufacturer’s published cut sheet. The cut sheet is the source of truth. If the block doesn’t match a real, currently-produced fixture, your construction documents will reference a phantom product.
When in doubt, contact the faucet manufacturer directly. Most reputable brands—including WEWE Faucet—maintain a downloadable CAD library tied to current SKUs and will email you the latest revision on request. This is the same workflow that commercial buyers use when evaluating industrial versus residential faucet specifications for hospitality and healthcare projects.
Rough-In Coordination: What the Elevation Block Tells Your Plumber
The elevation CAD block isn’t just a pretty picture—it’s a construction instruction. Once it’s placed on the interior elevation sheet, the plumber reads three critical dimensions from it: spout height above the basin rim, valve handle height(s) above the basin rim or finished floor, and the horizontal centerline-to-centerline spread between handles. These three numbers drive where the plumber roughs in the copper or PEX stub-outs inside the wall.
For wall-mount lavatory faucets, the typical North American rough-in places the spout 4–8 inches above the rim of the basin and 1–3 inches forward of the finished wall, with handle valves spread 6, 8, or 12 inches on center depending on the trim design. For wall-mount kitchen faucets, the spout typically sits 8–12 inches above the deck of the sink. Your elevation block should make these dimensions impossible to misread. If you’re laying out a custom rough-in—say, a vessel sink with an unusually tall vessel—you’ll want to coordinate the faucet elevation with the bathroom sink supply line rough-in height guidelines to make sure your stub-outs land in the right place behind the finished wall.
Common Rough-In Heights for Wall-Mount Faucets
- Lavatory (bathroom) wall-mount faucet: spout 4–8 inches above basin rim; valve centerline typically 36–42 inches above finished floor for vessel basins; 30–34 inches for undermount or pedestal lavatories
- Kitchen wall-mount pot filler: spout centerline 20–26 inches above range cooktop; supply stub-out centered on the cooktop
- Kitchen wall-mount sink faucet: spout 8–12 inches above sink deck; spread typically 8 inches on center
- Tub filler (wall-mount): spout 4–8 inches above tub rim; handles either single-lever or 8-inch widespread
- ADA-compliant wall-mount lavatory: spout no more than 4 inches above the basin rim; lever handles required; clear knee space below
Where to Find Reliable Wall Mount Faucet Elevation CAD Blocks
There are roughly three sources for these blocks, ranked from most to least reliable:
1. The faucet manufacturer’s own website. This is always your best option. The block matches an actual SKU you can purchase, the geometry is verified against the cut sheet, and the manufacturer updates the file when the product changes. WEWE Faucet, for example, provides CAD blocks and Revit families on request for every wall-mount fixture in our commercial catalog. Email our spec team with the model number and you’ll receive both the .DWG and .RFA files within 24 hours.
2. BIM content aggregators. Sites like BIMobject, Polantis, and the Autodesk Seek archive host manufacturer-authored content. These are generally reliable because the original manufacturer uploaded the file, though sometimes the listed model has been discontinued. Always cross-check the SKU.
3. Generic CAD block libraries. Sites that aggregate free user-uploaded blocks are the riskiest source. The blocks are usually drawn by students or hobbyists, often inaccurate, and almost never updated. Use these only for early schematic design, never for construction documents.
Material and Finish Notes That Belong on Your Elevation Sheet
The CAD block handles the geometry, but your elevation sheet also needs to call out finish and material—and those should match the schedule. A common error in commercial drawing sets is to drop a generic elevation block onto the sheet without updating the finish callout. The block says “Polished Chrome” because that’s what the original draftsperson typed in, but the spec calls for Brushed Nickel. Punch list problem.
When you place a wall mount faucet elevation CAD block, update the attribute text to match the finish, material, and model number on the fixture schedule. For commercial wall-mount faucets, the most common finishes are:
| Finish | Best For | Durability | Maintenance | Typical Commercial Use |
|---|---|---|---|---|
| Polished Chrome | High-traffic restrooms, hospitality | Excellent (PVD or electroplated) | Wipe with mild soap; shows water spots | Hotels, restaurants, healthcare |
| Brushed Nickel | Office restrooms, multifamily | Excellent; hides fingerprints | Low; tolerates hard water | Class A office, residential multifamily |
| Matte Black | Hospitality, boutique design | Good with quality PVD coating | Shows hard-water and toothpaste residue | Boutique hotels, upscale restaurants |
| Brushed Gold / Champagne Bronze | Luxury hospitality, residential | Good with PVD coating | Moderate; avoid abrasive cleaners | Five-star hotels, custom residential |
| Polished Brass | Heritage and traditional design | Excellent if lacquered or PVD | Lacquered: low; raw brass: high | Historic renovation, traditional residential |
If you’re trying to align your faucet finish with a broader interior design narrative, our guide on how to select a faucet that matches your decor walks through finish coordination for residential and commercial applications.
Code Compliance: Lead-Free, Low-Flow, and ADA Requirements
Your CAD block and your written specification need to agree on more than just dimensions—they need to agree on code compliance. In the United States, every faucet that contacts potable water must comply with NSF/ANSI 372 (lead-free, less than 0.25% lead by weight on wetted surfaces) and NSF/ANSI 61 (drinking water system components). Many states layer additional requirements on top of these—California’s AB 1953 and Vermont’s Act 193 mirror the federal lead-free rule, but compliance documentation is checked separately by some authorities having jurisdiction.
Federal energy and water policy under EPAct 1992 caps lavatory faucet flow at 2.2 GPM at 60 psi, and the WaterSense label requires a maximum of 1.5 GPM at 60 psi for residential lavatory faucets (and 0.5 GPM minimum to ensure usability). Your spec should call out the flow rate; your elevation block should reference the same model and therefore the same flow. If you’re sourcing for a project in California, Colorado, Georgia, or another state with its own water-efficiency rules, double-check that the model behind the block meets the local cap. For background, our explainer on how to identify lead-free bathroom faucets covers what certifications to look for on the cut sheet and packaging.
For ADA-compliant installations, the elevation block needs to show lever handles (not knobs), a spout reach that allows hands to be washed without striking the basin’s back wall, and a handle operation force not exceeding 5 pounds. The block’s dimensional callouts should make this readable at a glance.
Warranty and Specification Notes for Commercial Buyers
Commercial buyers reading construction documents care about more than geometry—they care about who stands behind the product after install. A good elevation block, when paired with a thorough fixture schedule, references the warranty terms. Most commercial-grade wall-mount faucets carry a 5-year finish warranty and a 5-year mechanical warranty on the cartridge; premium lines extend to lifetime residential and 5-year commercial. Our breakdown of faucet warranty terms explains how to read the fine print so the spec writer isn’t surprised when a hospitality maintenance team calls in a finish failure two years post-install.
WEWE Faucet’s Commercial CAD Resource Library
WEWE Faucet maintains a dedicated commercial CAD library for architects, plumbing engineers, and interior designers. Every wall-mount faucet in our commercial range ships with a matched .DWG elevation block, a .DWG plan view, a Revit .RFA family, and a manufacturer cut sheet with NSF/ANSI 61 and 372 certification documentation. The geometry is verified against production tooling, not just marketing renderings, so what you draft is what gets delivered to site.
Our wall-mount lineup covers single-hole lever lavatory faucets, 8-inch widespread two-handle wall-mount sets, ADA-compliant gooseneck models, and commercial-duty wall-mount pot fillers for restaurant kitchens. To request a CAD package, email our spec desk with the SKU or project type and you’ll receive a file bundle by the next business day.
FAQ
Where can I download a free wall mounted faucet elevation CAD block?
The most reliable free downloads come directly from faucet manufacturers’ commercial download pages, including WEWE Faucet’s spec library. BIM aggregators like BIMobject and Polantis are also good sources because the content is uploaded by the manufacturer. Generic free CAD block sites are the least reliable—the geometry often doesn’t match any real product, which can create rough-in errors during construction.
What scale should I draft a wall mount faucet elevation block at?
Always draft the block at 1:1 (full scale) in model space. The block will be referenced into a sheet that’s plotted at 1/2″=1′-0″ or 3/8″=1′-0″ for interior elevations, but the underlying geometry must be true-scale so the dimension strings read accurately. Drawing a block at the plot scale is a common mistake that breaks when you change sheet scale.
What’s the difference between a wall mount faucet elevation block and a plan block?
The plan block shows the faucet from above (the view your plumber sees when looking down at the rough-in stub-outs) and tells the contractor where to locate the supply lines horizontally. The elevation block shows the faucet from the front and tells the contractor at what height to set those stub-outs and how far the trim will project from the finished wall. You need both for a complete set of construction documents.
Do I need a Revit family if I already have a DWG block?
If your project is being delivered in 2D DWG only, the .DWG elevation block is sufficient. If your firm or the project requires BIM coordination—standard practice on most US commercial work over $5 million—you’ll also need a Revit .RFA family so the faucet appears in 3D plumbing coordination models and clashes correctly against framing, blocking, and MEP runs.
How do I know if a CAD block matches a real, currently-produced faucet?
Cross-reference the block’s dimensions against the manufacturer’s current cut sheet for the SKU. The spout reach, spread, overall height, and projection should match within 1/16 inch. If the block has no SKU reference, no source, or doesn’t match any current cut sheet, treat it as schematic-design only and don’t carry it into construction documents.
Can I use the same wall mount elevation block for both lavatory and kitchen applications?
Generally no. Bathroom lavatory wall-mount faucets and kitchen wall-mount faucets have very different spout heights, projections, and flow rates—plus kitchen pot fillers add an articulating arm that doesn’t exist on lavatory trim. Use a block drafted from the specific SKU you’re specifying for that application. Substituting blocks across categories is a common cause of rough-in errors.
What rough-in dimensions should the block call out?
At minimum: spout centerline height above the basin rim (or floor), valve handle centerline height, horizontal centerline-to-centerline spread between handles, spout projection from the finished wall face, and the elevation of supply stub-outs inside the wall. These five dimensions are what the plumber will use to set the valve body before drywall closes the wall up.
About the author: This guide was authored by the WEWE Faucet Commercial Specification team. Our specifiers work daily with architectural firms, hospitality designers, and plumbing engineers across North America, and have supplied manufacturer-verified CAD content for hotel, multifamily, healthcare, and restaurant projects since 2009. WEWE Faucet products are NSF/ANSI 61 and 372 certified, comply with US federal lead-free requirements, and are backed by a limited lifetime residential warranty and 5-year commercial warranty on the cartridge and finish. For CAD library access or project-specific specification support, contact our commercial team via www.wewefaucet.net.
您好!please sign in